Lime-Based Products
General Guidelines for Lime Stabilization
Description
This work consists of constructing a lime stabilized subgrade (LSS). It involves spreading, mixing, applying water, compacting, and grading the subgrade. If not specified, the work may also require determining the percentage of chemical to be used in the stabilized subgrade.
Mixture Design
Once a project is considered for soil stabilization, the type and percentage of the treatment additive required to meet specific project requirements must be determined from a laboratory mixture design. Common goals when treating soil with lime products are to achieve an increase in soil strength (e.g., ≥125psi) or reduce the plasticity index of the soil (e.g., ≤ 20 PI). Steps to develop this mixture design include material sampling, additive selection, and mixture design procedures. It is important that mixture design, pavement design, and anticipated project sequencing collaborate for developing the best solutions for the project.
The steps for modification or stabilization mixture design generally parallel each other, with the exception that stabilization designs require a minimum strength requirement, while modification designs may be based on less stringent or no strength criteria and prior experience.
Material samples must be obtained, basic materials tests performed, candidate treatments selected, and then mixture designs performed to determine additive options and treatment application rates to meet the goals of modification or stabilization and project requirements.
| Step | Description | Action |
| 1 | Material Sampling | Obtain material samples representing anticipated project materials in enough quantity for the anticipated number of mixture designs. |
| 2 | Basic Material Tests | Determine the moisture content, particle size analysis, PI, classification (including organics), and soluble sulfate content. |
| 3 | Treatment Selection | Select candidate treatments based on goals of treatment, project requirements, material availability, and Chemical Stabilization Selection Guide (see Treatment Selection). |
| 4 | Mixture Design | Perform mixture design based on goals of modification or stabilization |
| 5 | Reporting | Select and report the lowest additive content meeting project requirements and report the associated treated maximum density and optimum moisture content. |
This table presents a generalized framework for developing a modification/stabilization mix design
Material Sampling
A successful treatment program relies on a complete and thorough understanding of the materials that make up the existing subgrade and the cut/fill requirements along the planned alignment. A field visit must be performed to evaluate the project’s field condition and field samples should be obtained for laboratory testing. The degree of sampling and the extent of laboratory testing is often determined based on whether the subgrade plays a critical role in the design and the time required for sampling and testing. The field samples can help clarify the composition of the material that is to be treated. All material samples should be stored in airtight containers (typically in a plastic lined 5-gallon bucket) and kept separate from each other with their locations recorded. If sample gradations and material types vary significantly, this may indicate that several different mix designs need to be developed for the project or engineering judgment should be used to determine which soil type would be most detrimental for the project and decide how to handle the variability in the soil conditions.
Material Testing
Depending on soil characteristics, the following tests should be performed to help select candidate treatments:
- Soil Classification (ASTM D3282)
- Gradation (ASTM D422)
- Natural Moisture Content (ASTM D2216)
- Atterberg Limits (ASTM D4318)
- Soluble Sulfate (ASTM C1580 & Tex-145-E)
- Organic Matter (ASTM S2974)
- Specific Gravity of Soils (ASTM D854).
Treatment Selection
Use chemically stabilized subgrade for improving long sections of subgrade, as it is generally not cost effective for short spot locations.
Lime Stabilization has the potential to reduce initial construction costs through improved subgrade stability and reductions in pavement structure. Lime can also provide greater long-term stability of the pavement structure and lower pavement life-cycle costs through reduced pavement maintenance. Several lime-based products are used to treat soil with the most prominent being lime (CQL/quicklime or hydrated lime) and lime kiln dust.
Lime-based products are most effective in stabilizing soils with a plasticity index (PI) greater than 10 for Calciment® LKD and 15 for CQL/quicklime, and when the clay content is greater than 25%. These products are also superior at treating both expansive and overly wet soils.
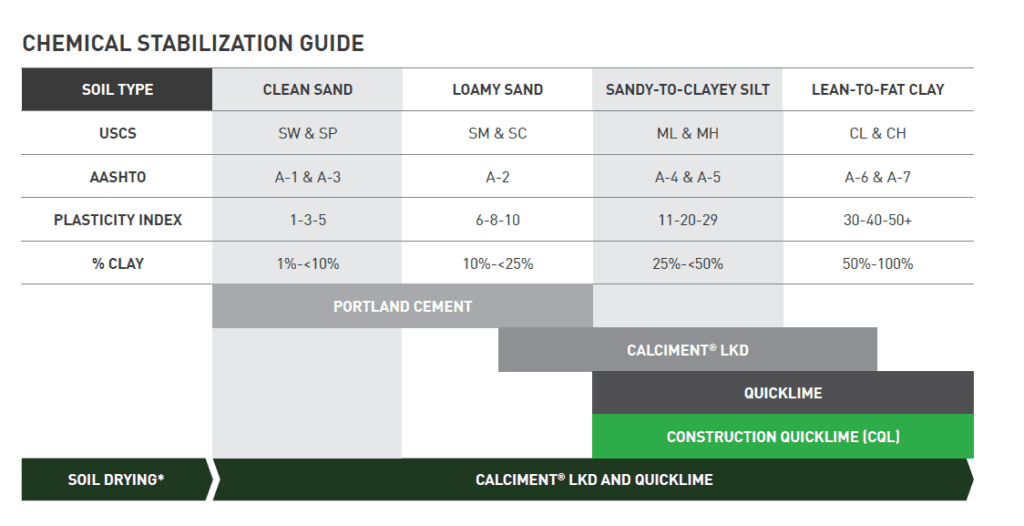
The chart above provides general chemical selection guidance based on various soil properties.
Quicklime/Construction Quicklime (CQL): If using lime, there are two types used for soil stabilization: quicklime, CQL, and hydrated lime, with quicklime being the most common. If spread using a spreader truck, quicklime must all pass 1/4” (6.35 mm) sieve. Quicklime must conform to ASTM C977 or AASHTO M 216, or State Qualified Products List, if applicable.
Lime-Pozzolan Blend: Lime kiln dust, such as Calciment® LKD, is another material that can be used for soil stabilization. Calciment® LKD combines quicklime with natural pozzolan and is often used to bridge the gap between cement conducive soils and lime conducive soils. Lime kiln dust must conform to the following requirements. Perform chemical analysis of the lime kiln dust according to ASTM C25.
Chemical Analysis:
| Combined total calcium oxide and magnesium oxide | 50% minimum |
| Available calcium hydroxide (rapid sugar test, ASTM C25) plus total magnesium oxide content calculated as calcium hydroxide | 30% minimum |
| Loss on ignition (carbon dioxide plus moisture, combined and free on as-received basis) | 40% maximum |
| Free water (as-received basis) | 4% maximum |
| Sulfur as SO3 | 10% maximum |
Sieve Analysis:
| Sieve Size | Minimum Percent Passing |
| No. 4 (4.75 mm) | 95 |
| No. 30 (600 μm) | 85 |
| No. 100 (150 μm) | 70 |
Portland Cement: If your soil conditions are sandy or low plastic, Portland cement should be considered.
Mix Design
The mix design process includes determining the amount of chemical needed to improve a subgrade soil’s engineering properties. To determine this amount, an assessment and understanding of the properties and materials of the existing soil is key. Before beginning a mix design, an analysis of the native soil properties must be completed to determine the soil’s baseline and enhancement potential.
For a detailed explanation on how to perform the mix design, refer to the National Lime Association’s 2006 technical brief entitled, “Mixture Design and Testing Procedures for Lime Stabilized Soil.” However, following the soil classification testing described under Material Testing, mix design testing is performed to determine the following:
- Dosage Rate: this can be done by trialing various dosage rates (e.g., 2%, 4% 6% by dry wt. of soil) or utilizing the pH to Estimate Soil-Lime proportions (per ASTM D6276)
- Treated optimum water content and maximum dry density (ASTM D698 or ASTM D1557)
- Strength:
a. Unconfined Compressive Strength (ASTM D5102)
b. California Bearing Ratio (ASTM D1883) - Swell Potential (ASTM D4546)
Mix Design Report
After the mix-design process has been completed, the test results should be compiled into a report and distributed to the owner-agency. The report should contain the following information at minimum:
- Untreated soil properties, including in situ moisture content, gradation, Atterberg limits, and the results of moisture and density testing (when applicable)
- MDD and OMC of the treated mixture and the mixture’s Atterberg limits
- UCS test specimens immediately after the moist curing period
- Treatment material name and source
- Recommended quicklime (or LKD) content as a percentage of dry materials
- UCS at each treatment % dosage (when applicable)
In addition to these items, a graph of UCS versus treatment dosage percentage as well as a moisture-density graph for the recommended dosage percentage should be provided.
Limitations
Temperature: Chemical stabilization should not be performed when the temperature is below 40 ºF (5 ºC) and falling or if the ground is frozen. Soluble Sulfates: If soluble sulfates are present in the soil at levels exceeding 3,000 ppm, it is recommended to follow the guidelines presented in the TxDOT Designation: Tex-145-E 2005.
Wind: Dust control is most critical as the lime is being applied (spread) and impacts the ground. When needed, prevent dry lime from blowing by adding water to lime, utilizing a shroud while spreading, limiting the height of the distribution bar to 3-feet (1m), or by other suitable means during windy conditions. Do not apply any reagent to the soil when nuisance dust may migrate from the job site or impact the general public.
Safety: When handling lime products, proper PPE, including eye protection and proper clothing (gloves, long-sleeve shirts, and long pants) is required. An N-95 respirator shall be worn if there is any potential exposure to nuisance dust.
Construction
Equipment: In general, the following equipment is used to provide a uniform mix of lime into the in-situ soil for roadway sub-base treatment:
Reclaimer / Mixer
Water Truck
Grader
Tamping / Sheepsfoot / Padfoot Roller (for final compaction)
Spreader / Distributor Truck
Smooth Drum Roller (for mellow)
Test Rolling: If stabilization is specified in spot locations, use test rolling with a proof roller to locate areas that require treatment. Unstable areas identified during the proof rolling should be evaluated by the contractor and geotechnical consultant to determine the depth of treatment required. Samples of the unstable material should be obtained for laboratory testing at this time to determine the percentage of chemical required for stabilization.
Preliminary Grading: The crown and grade of the planned roadway should be completed as necessary to match the construction drawings. Special care should be taken not to remove too much material at this stage because it is easier to remove material than add material after lime is applied. However, it should be taken into consideration that the volume of the subgrade, and therefore the grade elevation, may increase slightly with the addition of lime and Calciment® LKD.
Spreading: The amount of chemical applied to the subgrade is based on a percentage of the dry weight of the soil that will be treated. The percentage is typically 5 to 10 percent for Calciment® LKD and 3 to 7 percent for lime. If the Contractor Designed Chemically Stabilized Subgrade pay item is included in the plans, the contractor will determine the appropriate percentage of chemical based on a testing program. If the pay item for the contractor designed subgrade is not included in the plans, then use the percentage given in the plans.
When lime is shown on the plans, the quantities and percentage of lime are based on the use of quicklime. If the contractor chooses to use hydrated lime and the percentage is not determined from the Contractor Designed Chemically Stabilized Subgrade test program, adjust the percentage to account for the fact that quicklime is not being used (typically this means increasing the dosage by 25% when using hydrated lime).
To calculate the spreading rate (number of pounds of the chemical per square yard), use the following equation.
C = 0.75 × T × D × P
C = spreading rate for chemical (pounds per square yard)
T = thickness (or depth) of stabilization (inches)
D = average dry density of soil (assume 110 pounds per cubic foot, if unknown)
P = percentage of chemical, expressed as a decimal (e.g., 5% = 0.05)
0.75 is a unit conversion factor (9 ft2 / 1 yd2 × 1 ft / 12 in)
Example: if using 5% of a chemical and a 12-inch depth of treatment:
C = 0.75 × 12 in × 110 lb/ft3 × 0.05 = 49.5 lb/yd2 of chemical
The contractor shall submit a spreading plan for approval indicating how the contractor will achieve the required spreading rate. The spreading rate may be verified by taking the total weight of chemical spread and dividing it by the area that was treated.
Mixing: The mixing depth shall be specified but is typically required to be 12 inches. The contractor should mix the chemical into the soil within 30 minutes of spreading the lime. It is important to sufficiently pulverize the soil to the full depth and width of mixing, especially for cohesive soils such as silty clays and clays. A soil reclaimer that operates its mixing drum in an upward cutting direction shall be used to ensure the proper degree of pulverization and mixing. Water may be added by injecting the proper amount of moisture into the mixing chamber of the reclaimer or by placing water on the ground with a water truck in a separate operation. In either case, obtaining the correct amount of moisture is very important for achieving the target compaction, particularly in expansive clayey soil. Agricultural disks, graders, rippers, and other scarifying equipment are not recommended and may only be used with prior approval from the engineer.
Mixing should be continued until the product is uniform in color, meets material sizing requirements, and is at a moisture content that allows compaction to the required density.
Mellow: When stabilizing with traditionally sized quicklime (containing 3/16-inch particles or larger), it typically requires two separate mixings with a mellowing period in between the mixings. During the initial mixing, water shall be added as necessary to increase the moisture content of the soil to 3 percent (+/- 1%) above optimum moisture content. Determine the optimum moisture content from the moisture-density curves developed in the test program.
After the initial mixing, quicklime stabilized subgrades shall be allowed to sit undisturbed for at least 4 hours, but not more than 3 days, to allow for soil modification and the complete hydration of quicklime. The treated soil should be lightly compacted with a pneumatic tire or smooth drum roller if the mellow period will extend beyond 4-hours. As it mellows, the clumps of lime break down and the lime reacts with the soil, breaking up the soil clods. After the second mixing at least 60 percent of the mixed soil must be smaller than the openings in a No. 4 sieve. Any stones in the soil that would be retained on the No. 4 sieve are not considered when calculating the percentage.
If utilizing Calciment® LKD or CQL, the mellow time is faster due to the higher surface area to volume ratio and there will be better distribution of the lime from the initial mix. As such, if the chemical is adequately hydrated and mixed during the initial mix, a second mix (remix) may not be needed following the mellow period if the desired soil properties are met.
Compaction: Final compaction of a lime stabilized subgrade should occur within 3 days of the initial mixing. Compaction is performed with a vibratory, footed roller weighing at least 10 tons (9 metric tons). However, the final rolling is performed with a smooth drum roller without any vibration.
Curing: The chemically stabilized subgrade must cure for at least 5 days or until an adequate working platform has developed to withstand site traffic without disturbance (e.g., rutting) to the surface. Although not always done in practice, if specified, the surface of the chemically stabilized subgrade shall be wetted and covered with an emulsified asphalt (prime coat) or curing compound to retain moisture in the subgrade during the curing period. When applied, the curing coat must uniformly cover the surface of the chemically stabilized subgrade. During the curing period, all equipment should stay off the subgrade.
Proof Rolling: Proof roll the stabilized subgrade after the cure period. If the stabilization was performed properly and the planned depth of stabilization was adequate, there should be no deflection or rutting. The proof roll shall be performed by a tandem-axle truck of specified weight to ensure adequate and uniform treatment. Should localized fail to pass proof roll, undercut and replace with select fill or as directed by the engineer.
Fine Grading: After compaction with the smooth drum roller, final grading should be performed using a motor grader or similar equipment. The completed subgrade should be slightly overbuilt and trimmed to avoid the need for thin fills to achieve the final crown and grade. When required, aggregate base needs to be placed within 30 days of the fine grading, or as directed.
Contractor Designed Chemically Stabilized Subgrade
If the pay item for Contractor Designed Chemically Stabilized Subgrade is included in the plans, then the contractor uses the testing program described the National Lime Association Technical Brief: Mixture Design and Testing Procedures for Lime Stabilized Soil, October 2006, to determine the spreading rate for the chemical. Different mixtures of the soil and chemical are tested for unconfined compressive strength. The results are used to determine the percentage of chemical used in the field. The common increase in strength ranges from 20 psi to 100 psi with lime and from 50 psi to 200 psi with cement.
Method of Measurement
When lime is shown on the plans, the quantities and percentage of lime are based on the use of quicklime. If the contractor chooses to use hydrated lime, the quantity of lime measured for payment is decreased by the following equation.
Hydrated Lime tons = Quicklime tons / 0.757
[This factor comes from dividing the molecular weight of quicklime (56) by that of hydrated lime (74)]
Mixture Design Framework
Questions
Contact Mintek Resources to assist you with your next stabilization project.
Contact your Mintek Salesperson or give us a call at 937-431-0218 with any questions.
Before Stabilization

6% Application

After Stabilization
